Shabby Chic Spaces

Gorgeous vintage-themed craft spaces with a touch of a feminine feel.

Gorgeous Small Craft Spaces

A little inspiration for those having only a few square feet to play with.

Bin There, Can That!

A few ideas to recycle and repurpose. Use trash, save cash!

Are You a Wall-Nut?

A collection of words to adorn your walls.

Marlena's Craft Cottage

Yes, the whole cottage. Some girls have all the luck!

Welcome!

Hi! I'm Rochelle and welcome to BCS! This blog is a compilation of inspiring tips and ideas for craft spaces. Most of these are my finds from my own search for ideas and inspiration. All posts are linked to the sites or blogs where I found them. If I missed to link a post and it happens to be from your site or maybe you know the original source, please let me know and I'll link up! :)

Got any craft room ideas or organization tips to share? Want your craft room featured? Please contact me through this form.

Hope you enjoy browsing BCS!


Friday, October 21, 2011

The Craft Room Furniture Sketch

One of the greatest things about having this blog (aside from meeting new friends) is probably having all the inspiration I need right at my fingertips. I won't ever be able to memorize everything I've posted (I won't even attempt to) but I sort of recall having posted them and all I have to do is search through my archived posts. After all the ideas we've collected and admired together, planning how to set up my craft room table was pretty much a breeze.

So here's the grand plan!! I'm soooo excited! :)


Sorry for the unruly sketch, you guys. :) I'm not really great with pencils. But I'm trying to improve. Did you know that I have another blog where I give away free digital stamps that were hand drawn by me? hehe Yep, it's Paper Dreams of Mine. It actually started out as a personal blog but I'm having so much fun drawing and everyone is just so kind saying nice things and all that it's starting to be all about digistamp freebies. :) Alright, I'm getting sidetracked. Back to my table.

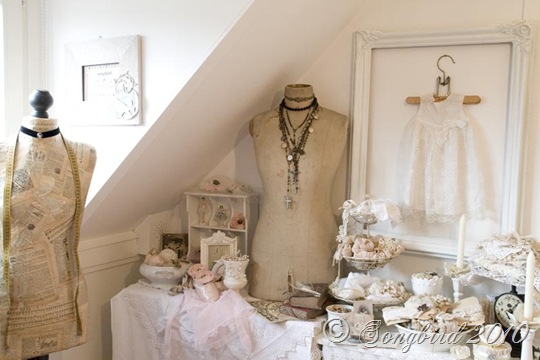
If you missed my last post, here's a photo of how my table looks like. I got this baby from hubby for my birthday. :) 


The top shelf will hold decorative items including a handmade inspiration board. The item beside it, it doesn't quite look like it but it's supposed to be a ball of flowers in a vase. haha I might add some photos on this shelf or maybe some cards I made.. We'll see..

The second shelf.. I want it to hold my supplies like scissors, pens, brushes, buttons and blings. 

I have to figure out what to do with the bottom shelf. It's a good place for my paper trimmer and metal ruler so I'm thinking I might have to keep from putting partitions on this shelf.

The left side of the table. Can I call this side the cabinet? It doesn't sound right but.. I don't really know how to call it. Anyway, those three will hold my papers, stamps and boxes. 

Good thing I don't have much supplies. This table is just the perfect size. I love it to pieces already. <3 

Will be back for an update soon! Hopefully, I can start organizing my supplies this weekend.

Thanks for dropping by!

Wednesday, October 19, 2011

My Favorite Craft Room Furniture

My craft table is my favorite craft room furniture! Why? Because it's the only furniture I have! haha But up until a few days ago, I actually had none, so not bad eh?

A little update on what's been going on with my little craft room furniture then.

Hubby and I have successfully put it together after a few frustrating hours of figuring out where the screws go and looking for the right side up. :) Of course, I was too excited to care about all the wasted hours! At last we got everything right and the whole thing made sense! Ta-da!

My Favorite Craft Room Furniture

What I love most about this table is that it has an invisibility feature! It closes up and hides away my stuff if everything's messy. haha


I did some minor changes on the storage doors. The whole thing is actually in wenge or dark brown, including the doors. I found it too dark and gloomy. As a matter of fact, if I had my way, I would have painted everything white. But we don't have the space for that kind of activity so I sort changed my doors the lazy way. I covered them with scrapbook paper. Yep. That I did. I actually realized it was not a very good idea even before I finished. haha I just threw caution to the wind. 

So after a few days, this happened. :) But I guess I already had it coming.


Turns out the paper I used was too light/thin. So what to do but change it right? I visited the local craft store and bought heavier paper. This is my only craft room furniture. If I can't paint it, I have to get it to look at least a bit like how I wanted it to.

If you're thinking of doing this, here are some things you need to know:

  • Peeling off double-sided tape will also peel off some of your furniture's paint.

  • Use heavy cardstock. It will hold up a lot better!
  • Use something to keep doors from closing after you have removed the door knobs. Arggh! I wasted 10 minutes of my time on this! I felt sooo dumb. haha

I'm happier with how it is now.. The new pattern is much prettier too! :)


I still wish to high heavens that I could paint the whole thing white. But a lot of things are simply not allowing me to do that so I've decided to simply look at the bright side. I now officially have my very first craft room furniture! :) 

Let's set this up together! Can hardly wait! :)

If you want to see ideas and inspiration for craft rooms, be sure to check out Beautiful Craft Spaces' Homepage! Lots and lots of ideas here for sure.

Thanks for dropping by today!

Wednesday, October 12, 2011

Extra! Extra! Read all about it!!

Hi, all! I've got news! Just two headline-worthy news. At least I think they're headline-worthy. :)

First, I guess one or two of you have noticed the new comment form. Isn't it a huge improvement?? I've researched on improved comment forms and have finally decided to get use Disqus. I love it! It's more versatile and has a lot of cool features that one could not find with the standard Blogger comment form. So, let me give you a brief idea how it works..

If you click on the Comments and Reactions link to leave a comment, the comment form will appear out of nowhere looking like this.


And then, assuming you would like to leave a comment and you click on the input field (the box where you write your comment), the "+ image" button will be enabled along with the "Post as..." button. See image below.

The "+ image" is fooorrr - drum roll please - adding an image to your comment! Fun right? You can share photos and links to craft rooms that you found inspiring and would like to share! And then of course, you can also add in photos of what you've been up to this week like craft projects and stuff and invite other readers over to visit your blog. :)

The "Post as..." button will give you options on what account you'd like to post your comment with. Clicking on it will give you this pop-up box.


Don't forget to click the "Link to your website" link below the box where you're supposed to type in your name. It'll add another blank field where you can provide a link to your blog. :)

Another feature I love about this comment form is this..


The option to reply to a comment! Eeeep! How cool is that! Okay, I'm sure some of you, my tech-savvy friends, don't really find this new but to me it is, it is!! It's a great improvement from my old comment form indeed.

That said, I do hope you'll put it to use. haha It would be sad to have an excellent comment form without comments. *cringe*

Okay, on to another news! Hubby and I have been looking around for a good craft table for quite some time now. One that would store my craft supplies and one that will not burn holes in our pockets. I wanted one because, well, it would be awesome to have my very own space. Hubby wanted me to have one because he was just tired of seeing my stuff everywhere. haha

Anyway, I found this table from Ikea and I thought it's perfect for me! I don't have much stuff yet so I think the storage space is enough, at least for a while. I would have loved to have more shelves of course, but budget was really a great concern for us.


Of course, we could not afford this exact same table so we looked for an alternative. And we actually found one! :) Hubby bought it for me as a birthday gift! Had my birthday a week ago, by the way. :) It was fun and my mum came over to visit. Okay, back to the table. Would you believe we got this for $70?? And it's brand new!


Granted, it does not look exactly like the Ikea table but still, value for money right?? This is a photo of the shop display, not really what we got. Well, the same table except we got it in wenge.

So now I'm excitedly planning how to set up my table! :) I'm sketching away! Will post my untidy sketch soon! So far, I've decided on two things. The first is that it will be girly. haha I'm just too much of a girly-girl to have it otherwise. The second is that the color scheme will be white, pink and yellow. Much like this craft area below. Except I don't think I can ever make it look that pretty.


Thanks for everyone who put in their two cents when I asked for help on deciding which table to pick.

And thanks for dropping by today! :)

Related Posts Plugin for WordPress, Blogger...
Twitter Delicious Facebook Digg Stumbleupon Favorites More